
I make a lot of things in cast iron dutch ovens – main courses, desserts, breakfast, dinner – but I’ve never just baked bread in one. There’s something special about the smell of fresh-baked bread, and in a campsite setting it’s almost a luxury, a wonderful side to any dish and a perfect accompaniment to a hearty camp stew. So this week, having never tried it, I tried to bake a simple load of bread in a dutch oven on my outdoor fire pit! Little did I know how many failures I’d have before finally getting it close to right.
The embedded video walks through my trials and tribulations.
I found a fairly simple recipe (see below) that was conducive to working in a campsite, and one that could be done in a few hours (as opposed to all day) and gave it a shot. The weather was cold, windy, but sunny – and I mention that because I think it influenced my subsequent failures.
Attempt number one was looking good, but the second rise… didn’t? At least not very much. My yeast was suspect to begin with, but it appeared to activate ok, so I pressed on. Apparently that was a bad decision. My loaf was extremely dense, PLUS, I burnt the heck out of it. By the time I was done, I was filled with disappointment and I’d run out of daylight so….

Fast forward a couple days, weather was roughly the same. (March has certainly come in like a lion around here). Attempt 2 failed even earlier. I had decided that part of my problem was that I had not kept the dough in a warm-enough place during rise time, and didn’t get the rise I needed. I took the important step of getting new, fresh yeast, and I tried to work at a higher temperature… but here’s the thing. In order to do this in a manner compatible with campfire cooking, I couldn’t make the assumption that I would have hot tap water available. Instead, I used a camp stove to heat up water in a small pot and dissolved the salt and sugar in that, then let it cool back to good yeast-activation temperature before introducing the little beasties. THIS time, I think I put the yeast in water that was too hot and killed them outright. Again, no rise. The bread came out more like a dense bannock that fried in the oven, rather than baked.
Third time is the charm!
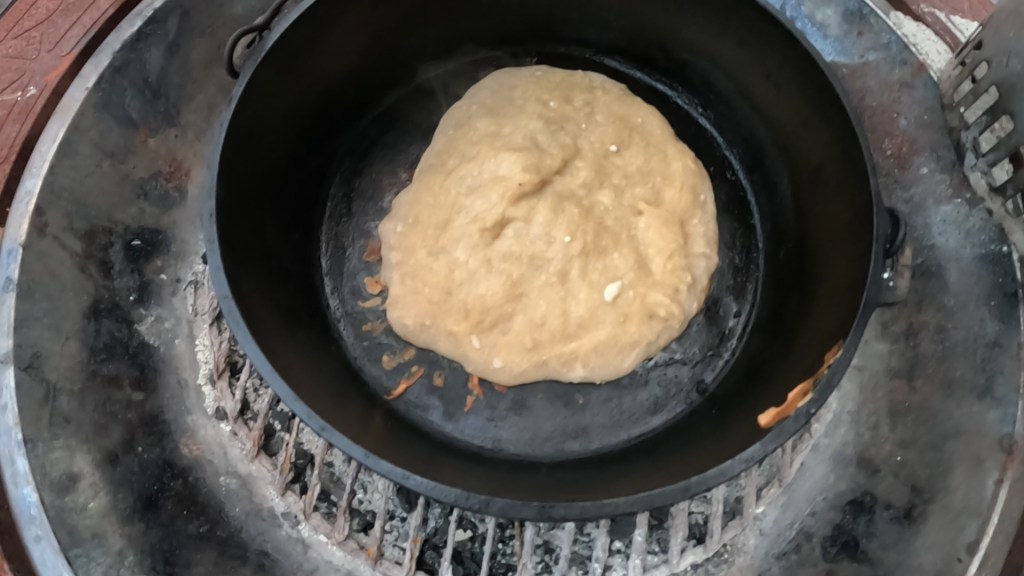
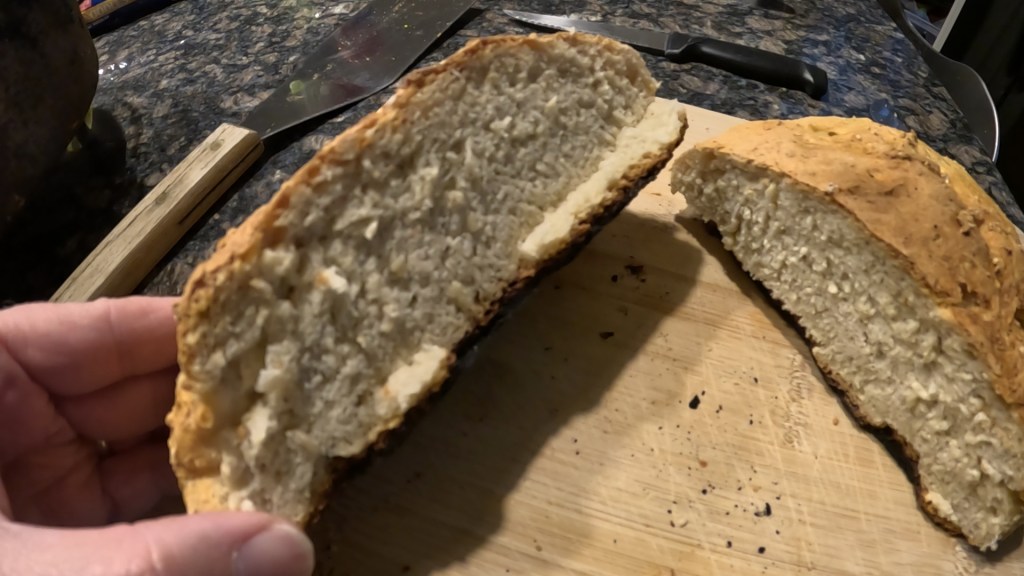
I’d suspected failure on batch two before the second rise, so I was already working batch three. I managed the water temperature better, and got a good foam out of the yeast. The dough held together well, the second rise was… better than any of the others, I’ll give it that. I kept the temps a little lower during baking so it took a little longer in the oven (about 40 minutes), but other than a slight char on the bottom I got what I’d call a successful loaf. Success!
But there’s more to learn…
My wife was making fun of me the entire time. Well, making fun, but also being very encouraging and supportive – it’s a fine line, but she knows where it is. I missed out on the COVID sourdough craze so in some respects I’m just now trying to learn what the world already knows. And, it’s a technique that’s THOUSANDS of years old, so how hard could it be, right? Well, she reminds me – so is pottery, and weaving, and flint-knapping, and I can’t possibly expect to just pick those up overnight…


So, yeah, even if you’re a decent cook, getting a good bread bake is somewhat magical. WHEN I do it again, I want to slow everything down. I think maybe do the first mix and rise overnight, let it sit until morning. Then give it a few hours to the second rise properly, and then maybe even a third rise. This really is the sort of thing that I think would turn out better in a proper camping environment, something that could be visited several times throughout the length of a day, and not something you rush to make it a one evening exercise. Having tried it a few times, I think I learned some important lessons in a somewhat controlled environment, so that on my next camping trip I’ll be emboldened to try again.
Here’s the recipe, if you want to try it yourself:
The Recipe
- 1.5 cups water
- 2 Tbsp sugar
- 2 tsp salt
- 1 pack dry yeast
- 3 cups all-purpose flour (in a gallon ziplock)
- 2 Tbsp oil

1) Get the water warm enough to dissolve the sugar and salt, then let it cool to about 110 degrees F. This is about the same temperature as hot tap water, or a little warmer than a hot tub. If you can put your finger in and leave it there without it feeling uncomfortably warm, you're ok.

2) Add the yeast to the warm sugar / salt water. Stir, cover, and let sit for five minutes. It should foam up, indicating that the yeast has awoken from its slumber, started to eat the sugar and generate carbon dioxide gas.

3) Add the yeasty water to the bag containing the flour. Seal and mix in the bag by squishing and blending. This is a great campground technique for mixing up dough - no mixing bowls and associated cleanup required. Knead for 10 minutes. Then, tuck the bag somewhere warm (about 75 deg F - I wrapped the bag in my puffy jacket), and let it sit for at least 45 minutes.

4) Hopefully the dough has expanded in this time and there are visible bubbles in it. Remove the dough from the bag and knead for a few more minutes. It should be fairly heavy and sticky, but cohesive. After kneading, form the dough into a ball and place it into an oiled dutch oven (or other cookpot). Cover the pot with a cloth and let it sit between 30 minutes and 2 hours. (When I do this again, I'll let it go the full two hours).

5) Bake over coals for anywhere from 30-50 minutes, depending on the heat you've generated. Rotate the pot and the lid in opposite directions every 15 minutes to avoid hot spots, but try not to let the heat escape. You can check it when it smells like bread.

6) Take it off the heat, and out of the pot, and let it rest for about 10 minutes for the crust to harden. And enjoy!

Note: I've done some baking in a normal campfire cook pot as well, and you can try it here. That requires a low heat underneath (over coals or on a camp stove on a low setting), AND building a twiggy fire on the lid to provide heat from the top. You need heat above and below to duplicate the effect of an oven - so maintaining a small fire on the lid is essential.  Needless to say this is a varsity maneuver. It's doable, but makes a challenging thing even harder!


I hope some of you reading this will give it a try, and I encourage you to let me know if your efforts are successful!
Get Out There!

It looks good to me! I’ve never cooked in a Dutch Oven, not something you take backpacking. But we had one along on our 18 day raft trip through the Grand Canyon and I was amazed at the variety and tastiness of what was cooked in it.
LikeLiked by 1 person
Yeah it’s not a backpacking item, but when that’s not a limitation, I love having it. You can cook almost anything in one. As far as this bread went, the actual baking wasn’t the hard part, it was the chemistry (and biochemistry) that killed me!
LikeLike