Welcome to Wilderness Chef!
I plan on this being a monthly segment on Flying-Squirrel.org where I try to convince you that camping food can be better than hot dogs on sticks! Better than s’mores! (I actually really like s’mores…) Better than pouring boiling water into a bag of powder and bits of dehydrated “stuff”!
Cooking outdoors is one the aspects of camping and backpacking that I really enjoy – everything tastes better outside, and there’s a lot of room for creativity. Frankly, if you’re out on a prolonged trip, you NEED a little variety – just like at home, you just can’t get by with the same old things every day. With a little prep and a little planning, you can mix things up, work culinary wonders and impress your friends without paying a huge weight penalty. Like anything else, it’s a skill that takes practice, and it’s fun to learn.
To kick things off with Wilderness Chef, Episode #1, I’m doing an easy, car-camping comfort-food belly warmer perfect for a January evening – Dutch Oven Jambalaya!!
So… not wilderness at all… and using a pot that’s way to heavy to backpack with. But it’s an easy, tasty alternative to your normal car-camping fare. We’ll cover all those other scenarios in future episodes. This jambalaya can be done entirely on a fire, as I did last week. Check out the YouTube link at the bottom of this article if you need to see how this was done (or just want proof I’m not just throwing recipes around without actually preparing anything)!
The Tools
Since this is the first installment, I have to talk a little bit about Dutch ovens. If you don’t have a Dutch oven, I’m sorry – you’re missing out. A good cast iron Dutch oven is an easy, forgiving cooking tool that can make any cook look good. Cast iron does a great job of distributing heat evenly, and creating a very uniform temperature throughout. It’s great for baking! Cakes, pies, cobblers.. all can be done on a fire, but baking is a more advanced skill. This jambalaya is a good entry-level dish that shows off the Dutch oven’s talents for savory simmering, without fiddling with coals on the lid. In fact you barely use the lid for this one.
Ovens come in various sizes, from 10″ up to a monstrous 16″ – but for this we’ll use the common 12″ size, which will yield about 6 large, up to 8 moderate, servings.
Dutch ovens are easy to care for, but they do require special handling – above all, NEVER LET THEM TOUCH SOAP! Instead, a clean water, thorough rub-down, with clean (non-soaped) copper pads if needed, and then a coat of oil to seal. A full description of Dutch-oven seasoning is a topic for another discussion. Suffice to say it doesn’t matter how rusty and ugly an oven looks on the outside – if it’s clean and jet black inside, you’re good to go!
The Heat
There are two approaches to cooking with a Dutch oven, but both require coals, and lots of them. The magic of these ovens, aside from even heat, is their ability to provide slow-cooker-like performance for long simmers, perfect for roasts, stews, etc, so most recipes literally require a few hours to complete. Perfect for those evenings where sitting around the fire was already on the agenda.
To do it with a wood fire, you need a substantial volume of hard woods that can cook down into sizeable coals – which means that you need a good-sized fire that’s been burning for a while, and you need to keep it burning. This is a fine approach, but it requires a lot of firewood, and requires some dedicated attention to keeping a fire going. In some circumstances, this sort of defines “camping”, and there’s certainly nothing wrong with this.
Your other option is simpler – use charcoal briquettes. It’s a little like cheating, but if you’re car-camping or otherwise able to have lots of gear available, it’s a viable option. Charcoal is ready to go quicker than wood, and you can more reliably get enough of it to keep the heat on for the duration. I like to fire the briquettes in a charcoal chimney, without lighter fluid. If you keep hot coals handy in the chimney, you can add them as needed to your hearth to keep your oven hot.
You will no doubt see many tables, charts, etc online that give you precise measurements – so many coals underneath, so many on top of your oven to get a 375-degree baking temperature, etc, etc. I have to confess I’ve never paid any attention to this, even when baking. Cook with a Dutch oven long enough and you’ll develop a feel… and realize you have to pay attention to what’s cooking, and add/subtract heat as necessary.
For this dish, just start out with a layer of coals the size of the bottom of your oven, and lay your Dutch oven right on top as if it were a burner on the stove. You may have to shuffle some coals around to level your oven – “sort of level” is fine for this recipe.
The Recipe
 First off I have to confess I don’t know the origin of this particular recipe. I’ve made it several times, have made some slight variations each time, and now do it from memory. My advance apologies to anyone who “invented” this – and my heartfelt thanks to whoever did it!
Total cooking time for this one is relatively short, about 1:10.
Ingredients
- 1/4 cup (1/2 standard stick) Butter
- 1.5 pounds skinless, boneless Chicken, in bite-sized chunks
- 1 pound Kielbasa or Smoked Sausage, sliced into chunks
- 1 medium Green Bell Pepper, diced
- 1 medium Onion, diced
- 3 stalks Celery, diced
- 2 (14 1/2-ounce) cans Tomatoes, diced
- 1 (14 1/2-ounce) can Chicken Broth
- 1/2 pound medium Shrimp, peeled
- 2 cups Instant Rice
- Salt, Pepper and Hot Sauce
At Home
1) Dice up all your veggies, put them in a gallon zip-lock. There’s a trade-off here – veggies won’t keep as long as whole ones (in fact whole ones don’t even need refrigeration, typically). If you have a cutting surface and WANT to do a lot of prep on-site, you certainly can, but pre-packaging just saves time and effort while cooking, and your bag is easily packed in a cooler. There’s nothing wrong with prepping what you CAN at home, with all the amenities, before committing to the woods.
2) Slice up your kielbasa and pack in a bag. (Ditto comments above).
3) Cut chicken into bite-sized chunks and pack in bag. (Again, a home-prep time-saver AND a way to help avoid cross-contamination between uncooked foods in camp). Note this is the one item I did differently in the video – I was pressed (by daylight) in prep time, and chicken was the first thing in, so I had to get cooking. I put them in whole and cut them in the pot, but if I hadn’t had to keep enough light to film it, I’d certainly have cut it up beforehand. Particularly in the woods, keeping your hands away from raw poultry is a good thing!
4) Peel and clean shrimp – this is the one ingredient you really have to pay attention to, in terms of shelf-life. Fresh shrimp won’t last long, so freeze it (and let it thaw before cooking), make sure it stays cold, OR use frozen shrimp to begin with. If it’s going to be more than a day before you cook this, canned shrimp is an acceptable alternative here, to provide the jambalaya flavor without the risk of seafood going bad.
5) Pre-measure your rice into a small zip-lock.
6) Pack all your meats (chicken, jambalaya, shrimp), butter, and veggies in the cooler.
In Camp
1) Fire up your coals, and make a layer big enough for the Dutch oven to sit on. Once your oven is hot, throw in the half-stick of butter, followed by the chicken.
2) Cook the chicken in the butter, until cooked through (no pink).
3) Add sliced kielbasa
4) Add diced veggies – pepper, onion, celery – and cook until they’re tender.
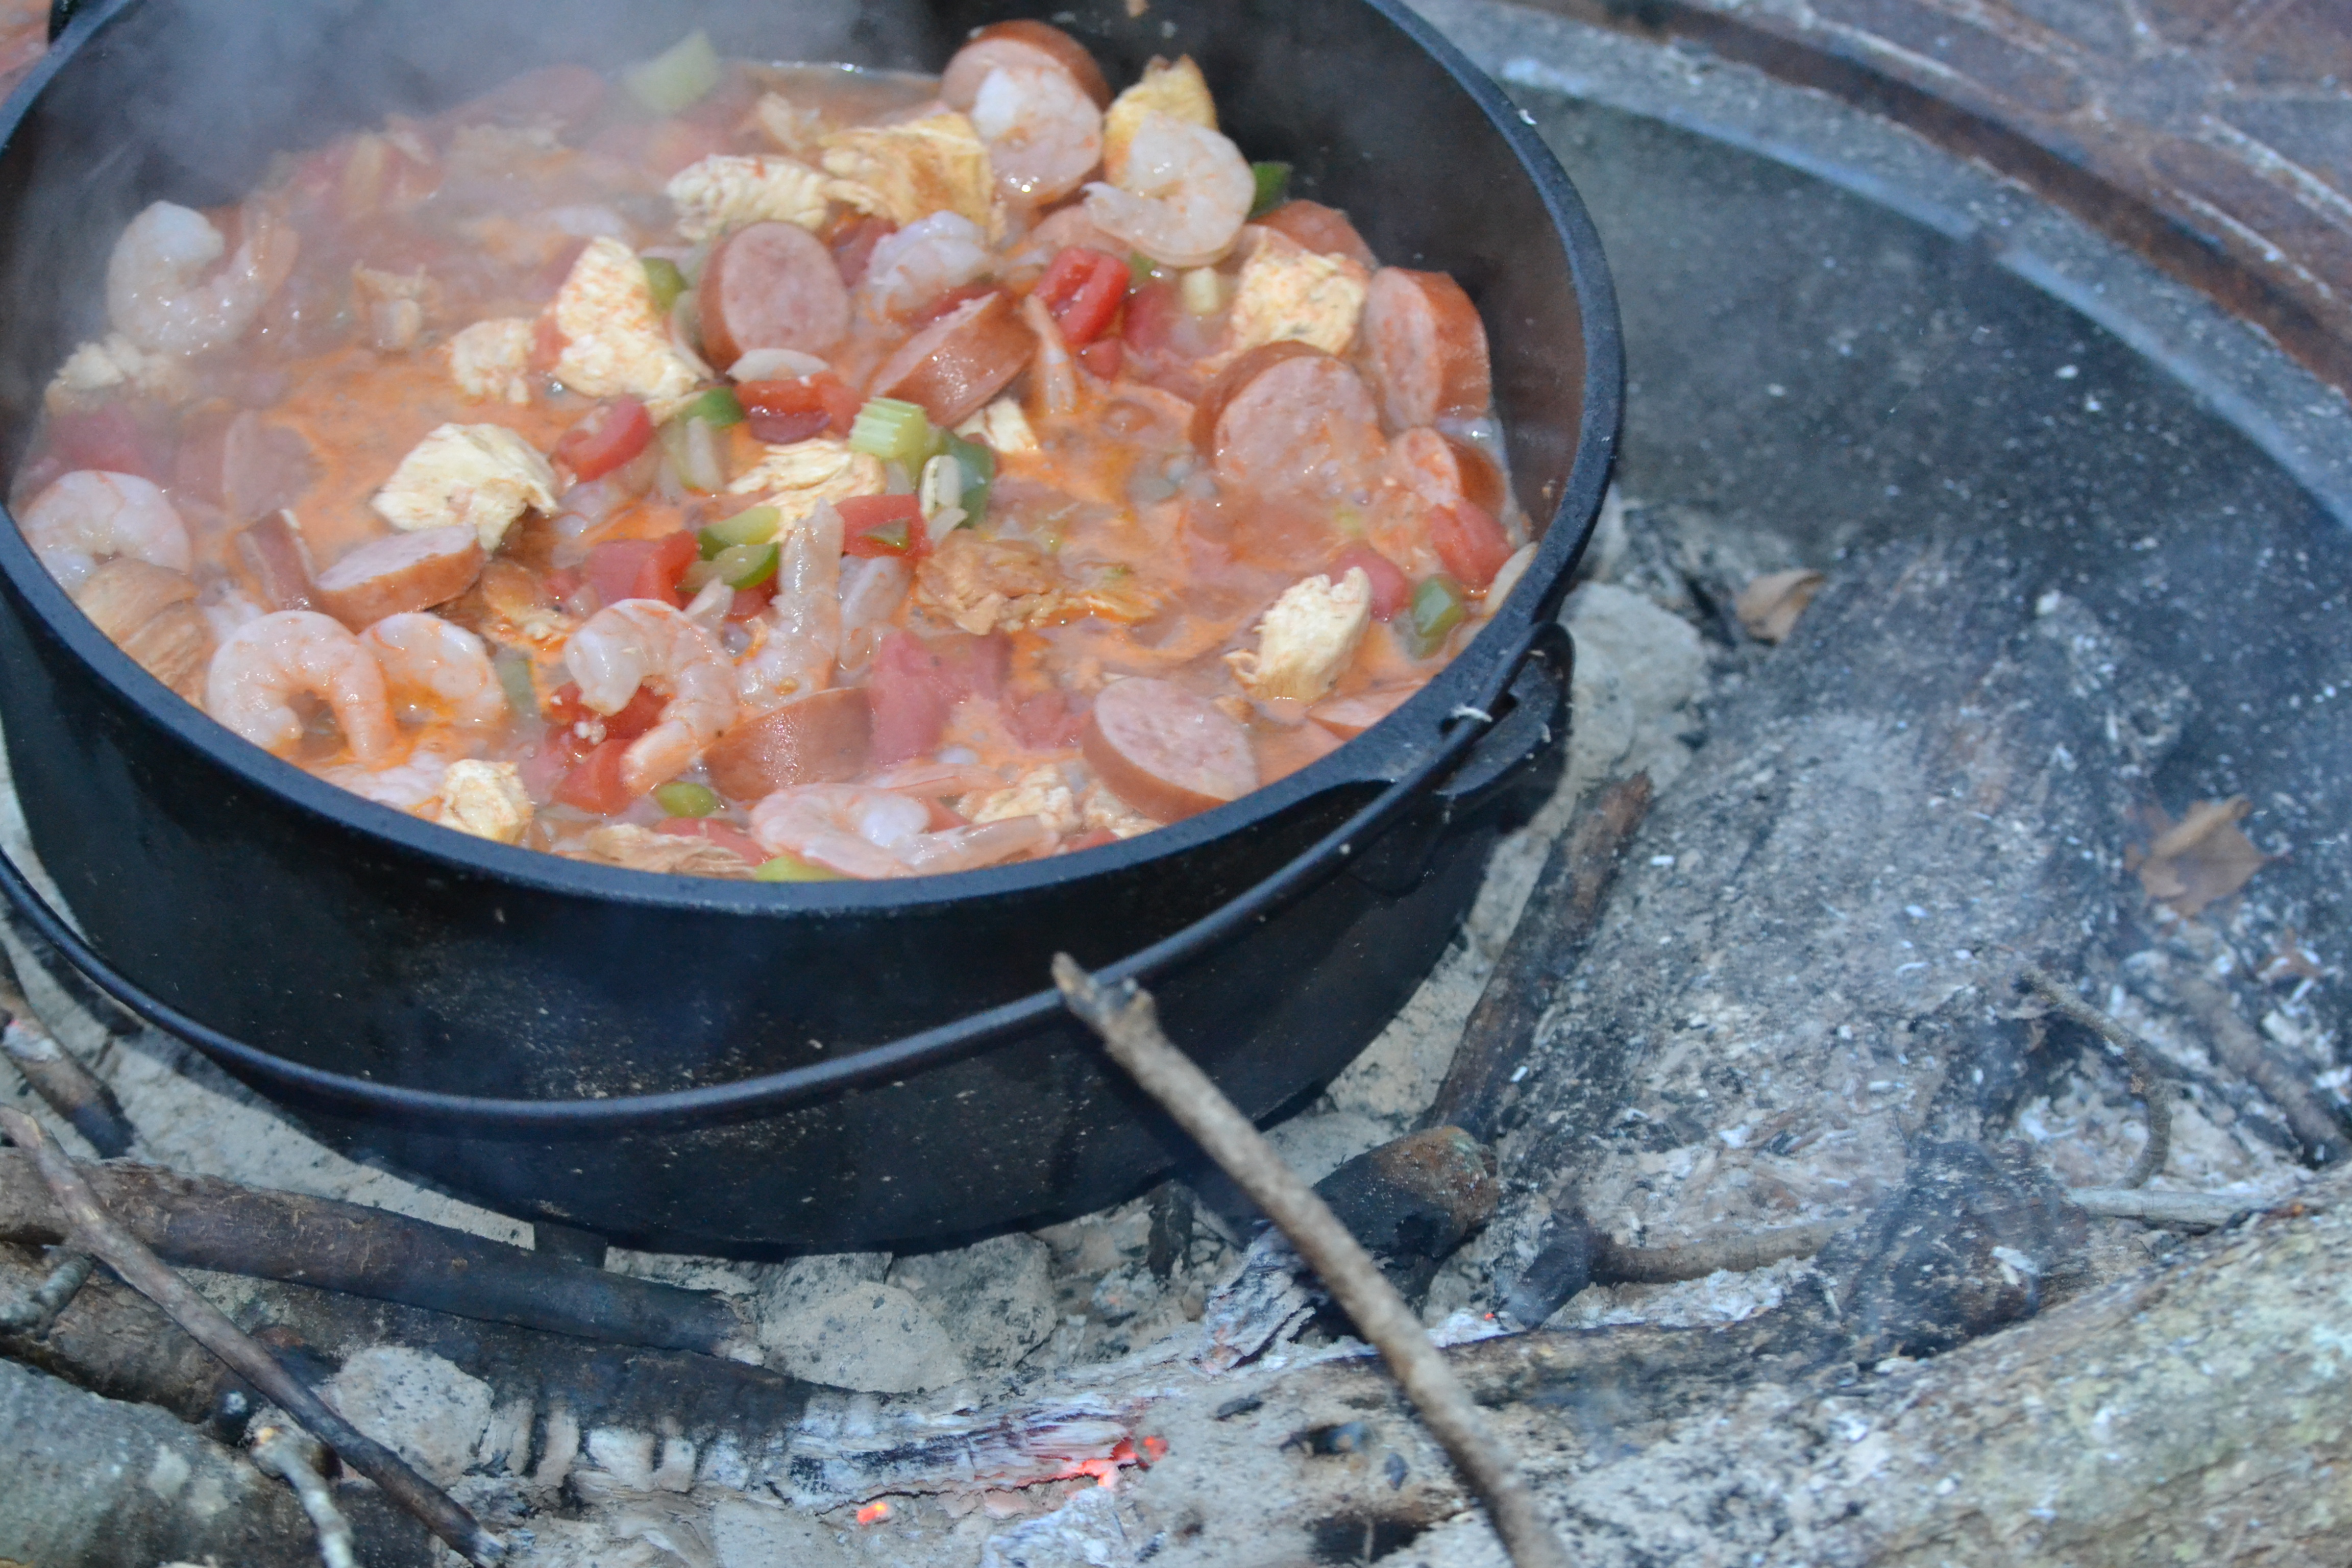
5) Pour in cans – 2 tomatoes, 1 chicken broth – and bring to a boil. (At this point you may need to add some fresh coals to keep your heat up). Simmer for about 10 minutes to let the flavors mingle.
6) Add shrimp, let cook for 5 minutes. Verify that shrimp turns pink and opaque before continuing.
7) Add instant rice, stir to mix, then put the lid on the oven, pull the oven off the heat, and let sit for 5 minutes to let the rice re-hydrate.
8) Add seasoning and enjoy! (I find a bit of tabasco really makes this pop).
Easy, right? Tasty, too! Certainly a break from “regular camp food” – give it a try, I’m sure you’ll enjoy it!
I made this at home (in the fire pit, on my deck) last weekend, and made a video of the process. If any of the above doesn’t make sense, feel free to follow along on YouTube.
Next month?
I’m not sure… Keeping with the winter comfort-food theme, I was really looking hard at creating a Dutch-oven variant of a Bolivian pork dish (Aji de Carne), which is a slow-simmered roast/stew with a tropical twist. Decided that might be too “exotic” for the first episode here, but it’s really tempting – it would be my own adaptation, and I’ve never done it in a Dutch oven before. I may give that a try, but if you have specific requests or suggestions, let me know!
Get Out There, and Bon Appetit!
Troy
